|
ID: 1
Title: HotHTML 3 Dialog Framework Architecture Overview
Author: Thushan Fernando [ Senior Software Architect ]
Date: 26th June 2004
Description:
An overview of the HotHTML 3's native Dialog Framework for third party developers who are interested in writing third party extensions to HotHTML 3.
Keywords:
devsdk, dev, hothtml, hothtml 3, dialog, dialogs, dialogsdk, software, develop, developer, development, vb, visual, basic, visual basic, vb6, .net, com, com+, microsoft, studio, activex, dll, main, ide, class
Introduction

HotHTML 3 was a major upgrade incomparison to previous releases of HotHTML in the past.
For one, we've redeveloped the entire editor from scratch. New user-interface enhancements and a brand new syntax highlighter were among the
first things to be implemented into the IDE. But another aspect of the IDE which we spent many months of design and work on was the third party Plugins area.
Alot of research and development went into the building of an archictecture that was easy to understand, easy to implement and easy to deploy extensions (or plugins)
written by third party developers for our editor. This article is aimed at giving you a good grounding on understanding the key elements of the Framework
and get you started on writing your own custom extensions known as 'Dialogs' for HotHTML 3 (and possibly) HotHTML 2001 too. It doesnt however, go into a great amount of
detail regarding creating your own Dialogs, this will be covered in detail in other articles later on. For the moment, this article is a look into the Framework
from a new developers perspective.
Pre-Requisites
Before you begin writing 'Dialogs' for HotHTML 3 there are a few things that you will need.
- Copy of HotHTML 3 Installed
The first step is to ensure that you have a working version of HotHTML 3 installed and running on your system. You can contact us to arrange a special license if you are going to be writing extensions for HotHTML 3 and you have not yet purchased a license.
- DevSDK Installed
Obtain the latest SDK available from here. The SDK contains examples, documentation as well as the required header files, modules, class modules etc to get you started.
- Microsoft Visual Basic 5 or 6
The DevSDK ships with VB6 code so you will need to have VB6 installed (VB5 is OK too) to be able to run or compile the end result
- Experience in VB and ActiveX Components
While we designed the Framework keeping in mind to make it simple to pickup, you will need to have a good understanding of VB and ActiveX components(COM) before you start writing plugins.
After that your ready to start writing butt kicking extensions.
The Architecture
The Dialog Framework itself is built around the Component Object Model (aka COM). By harnessing the power of COM we can allow third party developers to
integrate their own Dialogs - which is another way of saying Plugins or Extensions - into the HotHTML 3 IDE.
Creating an initial Dialog requires - in VB - you create a new 'ActiveX DLL' Project. Then when you compile or build your end Dialog, it should be
compiled into a DLL - Dynamic Link Library - and placed into the /plugins/ folder in the HotHTML 3 Installation Directory. This is especially important for debugging dialogs you create, HotHTML 3 will look for *.dll files in the /plugins/ folder at startup, any other extension and it will by pass it.
Below is a basic overview of a bare-bone Dialog.
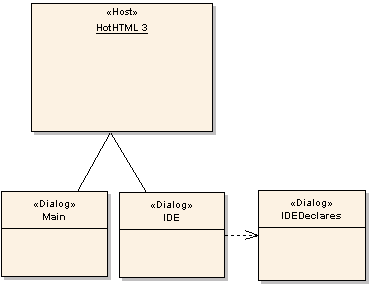 Figure 1.0 - The Basic Bare Bone Architecture of the Dialog Framework Figure 1.0 - The Basic Bare Bone Architecture of the Dialog Framework
Lets go through what each component is.
- HotHTML 3 [ Host ]
This is the HotHTML 3 IDE
- Main [ Dialog ]
The Main Class is the main entry point for the Dialog in the Framework. It is where the Dialog gets instantiated for the first-time (whether at startup or when the user requests it), retrieves information about the Dialog and decides how to run the dialog. The Main Class plays a biggest role in the Dialog Framework.
- IDE [ Dialog ]
The IDE Class maintains information about the IDE by setting properties in the class module which stores the values in the IDEDeclares Module, therefore the IDE Class depends on the IDEDeclares Module to be present to work.
- IDEDeclares [ Dialog ]
A Private Module that's sole purpose is to keep information about the IDE when the Dialog is run.
When you create your own Dialogs there will be more components(forms, class modules, modules etc), however the basic three(Main and IDE Classes and the IDEDeclares module) should exist across all Dialogs.
In Depth - The Main Class
As mentioned earlier, the Main Class is what HotHTML 3 first looks for when its executed. It contains several important functions that tell HotHTML 3 how best to manage your Dialog before execution, during execution and after execution. So lets take a moment to go through the most important parts that you will need to know when creating a Dialog.
- PluginID
Enter a unique ID for your plugin. You may wish to use the App.Title or the project name of your Dialog.
- PluginName
This is the actual name of the plugin itself. So you can have 'ACME Helpful Tools' or some such
- Description
A Small description of your Dialog for the user to know what your Dialog does.
- PluginToolTipText
This is the Tooltip text that will be shown when someone hovers over your Dialog item in either the 'Dialogs' menu or the QuickInsert portion for Dialogs.
- Author
The author - Company/Individual - who wrote the Dialog.
- Email
Originally this was meant to be the Email of the author but as things got moving we recognised that company's may write Dialogs too, so if you are going to enter an email address you need to include the 'mailto:' portion, otherwise the 'http://' part for a website.
- Icon*
The Icon* functions are what should be displayed for each function. Eg. IconNormal is the icon that should be shown in the menu's normally, IconDisabled when the item is disabled and so forth.
- bIsHotHTML3Dialog
An Important function that returns a boolean indicating whether or not this Dialog contains HotHTML 3 specific code which will render it unusable in pre-HotHTML 3 versions. This means if you use or interact with the IDE Class (or IDEDeclare's variables) or use GUI related functions, these will not work in pre-HotHTML 3 versions.
- bCompatibleWithPreHotHTML3
A compliment to the 'bIsHotHTML3Dialog' function, this allows you to still run the Dialog even if its running in pre-HotHTML 3 hosts, ofcourse you will have to disable any HotHTML 3 specific code manually, but setting this to FALSE will stop it from being loaded in HotHTML 2001.
- PluginGUID
A required part of a Dialog, this uniquely indentifies a Dialog by the GUID that you place. Dont use the GUID of the ActiveX Component(which can change if you dont use compatibility), generate one from our GUIDGen tool which ships with the DevSDK.
- PluginStart
The EntryPoint for the HotHTML 3 host to instantiate your Dialog. We will discuss this in more detail later.
There are several others that are included which go beyond the scope of this topic, however the ones above are the major parts that you will need to know.
PluginStart() Where It All Starts
The PluginStart() Function is the main entrypoint for the Dialog, after ensuring that there is indeed a Main Class available, HotHTML 3 will attempt to
run the [Object].PluginStart() Function. This is where we setup our Dialog to be run, including initialising the main form and setting up a call back -
for HotHTML 2001. Below is the code for this function:
Public Function PluginStart() As String
        Dim frmPlugin As New frmMain
100     PluginStart = 1     '// Initiating Plugin*
102     Set frmPlugin.CallBack = Me
104     frmPlugin.Show vbModal  '// Show Plugin Form
106     Set frmPlugin = Nothing '// Kill me now or forever hold your peace
108     PluginStart = 0 '// End of Plugin*
        Exit Function
Hell:   '// Where all the naughty people live
        Err.Raise vbObjectError + 3953, "wHotHTML3DialogSDK.Main.Start()", _
            Err.Description & vbCrLf & vbCrLf & "Line: " & Erl
End Function
When the Dialog is first instantiated we set PluginStart to be equal to 1, this will tell HotHTML 3 that the Dialog is still running when and if an error
occurs. After that we setup a callback to return whatever the output is to put into the document - for HotHTML 2001 - and start our main purpose - in this case
its to show frmMain. When showing forms initially we use vbModal because we want the Dialog to have full focus, without it if the user clicks outside the
form, the Dialog is put behind the main IDE, so the IDE has to be minimised before being able to be accessed again.
After the MainForm is closed (and because we used vbModal) the statements proceeding the .Show statement run, this includes the unallocating of resources taken up
by frmMain and finally telling HotHTML 3 that this Dialog has done its 'thang' and its ready to be garbage collected. Thereafter HotHTML 3 will handle
unloading the COM object and freeing any final resources it may have consumed.
Get The Pary Started
After you've downloaded and installed the DevSDK, look through the samples. We have spent many hours commenting most lines of code so its easier to
understand what exactly is happenning. When your comfortable enough to start writing or playing with making your own Dialog simply make a copy the 'BaseTemplate'
and call it whatever you wish, and start editing the Template to your liking.
Areas you will need to edit (from the Base Template sample):
- Project Properties
General Tab:
- Project Name
- Project Description
Make Tab:
- Application Title
- Version Information
- Main Class
Configure function by function making sure you follow the comments suggestions.
Then you can start adding forms, class modules etc to complete your Dialog.
The Compatibility Settings and Compiling & Debugging Dialogs
Developers spend more time debugging their code than writing new code, therefore its essential to understand how best to debug your Dialog when you are
still developing and fine tuning it.
Compatibility Settings
We recommend you use the 'No Compatibility' setting in the 'Component' Tab in Project Properties, however you may also consider putting the extra bit of effort
and using the 'Binary Compatibility' setting. Either way HotHTML 3 will unregister the Dialog at shutdown and re-register if its allowed to load at startup.
Compiling
When your ready to compile and start debugging what you have written its essential you follow some rules so that HotHTML 3 can instantiate your Dialog:
- Name According to Project Name
Your ProjectName should be what the resulting compiled ActiveX DLL should be, this is because HotHTML 3 will attempt to create an object of '[Filename].Main' at startup.
So if your Dialog's name is 'RubyParser' you should name your compiled ActiveX DLL RubyParser.dll.
- Must have extension DLL
You must ensure that the extension for the filename is DLL (by default it will be), HotHTML 3 ignores any other files it may find.
After compiling run an instance of HotHTML 3 to see if there are any issues.
Turn 'DebugMode' ON
When your debugging your Dialog, you may consider using the DebugMode feature in HotHTML 3 to log all the actions HotHTML 3 is doing when it instantiates your Dialog, runs it
and terminates it. To do this goto 'View > Options' then under the 'Startup' item tick the 'Debug Mode' option and restart HotHTML 3. This will output
debug information to the new tab which will appear after you restart.
Distributing Dialogs
From FixPack 1 (more information) we have included 'wsDialogInstaller' which will enable you to distribute your dialogs easily and ensure
that they are installed successfully and with minimal user interaction. Also offering RAR compression to keep filesizes small for transfering over the
internet. In a future article we will discuss how to use wsDialogInstaller in detail, for the moment, checkout the Installer.ini file in the Examples folder
and follow through the comments.
FixPack 1 Changes
In FixPack 1, after recieving valuable feedback from our users we decided to revamp how Dialogs are managed and developed in HotHTML 3. In particular,
to provide developers with the ability to write Dialogs that integrate seamlessly with the HotHTML 3 IDE. This meant that under the hood many changes
were made - including much tweaking of the code - to provide a suitable platform to write them while still preserving the compatibility for previous
HotHTML 2001 plugins and early versions of HotHTML 3 Dialogs. For the users, a new DialogManager tool to be able to disable certain dialogs from loading
at startup without having to physically remove them from the folder and managing of 'In-Memory' Dialogs that make use of the new integration methods.
We also introduced the 'PluginGUID' function which will give each Dialog a unique ID to identify it. Overall, these changes - we believe - will pave
the way for complex integrations and development of some really nice and useful Dialogs for HotHTML 3.
Conclusion
Hopefully you've got a rough idea about how the Dialog Framework works and how HotHTML 3 instantiates and runs your Dialogs. We talked about certain rules
that need to be followed when creating Dialogs, about the important properties in the Main Class and gone through regarding Compiling, Debugging and Distributing
brielfy.
In the coming months we hope to extend these articles to cover wider area's and topics, if you have any comments or queries please dont hesitate to Email Us.
|
|
|
 |
 |
|
|
WebSoftware is happy to announce that HotHTML 3 FixPack 6 has arrived with support for Windows Vista SP2, Windows Server 2008 and Windows 7. With this release, HotHTML 3 Professional is now completely freeware! Go download your copy today!
An update is available that includes several performance enhancements, no new bugfixes or changes are included but uses newer compilers and optimsations for newer CPUs.
WebSoftware has released FixPack 5 for HotHTML 3 Professional, includes lots of bugfixes and performance improvements.
WebSoftware has released FixPack 4 for HotHTML 3 Professional, this release is primarily a bugfix release and is recommended for all users.
WebSoftware has released FixPack 3 for HotHTML 3 Professional, with several new features such as one-click validating, indenting and auto-correcting of HTML/XHTML files and many new enhancements based on user-feedback. Click on the headline for more information!
WebSoftware has updated the hugely popular freeware version of HotHTML 2001 Professional to v1.0.10. Most of the updates include numerous performance tweaks and several bugfixes. Download a slimer, leaner and juiced up copy today!
WebSoftware is pleased to announce the FixPack 2 release of HotHTML 3 Professional. FixPack 2 includes numerous bugfixes, enhancements and feature-requests from users.
Welcome to the fourth version of the WebSoftware site. Sporting an all new look and feel - in an Office 2003 theme, breadcrumb navigation, new SupportCenter and our Knowledgebase and much more! To learn about the new features click on the headline!
|
|
|
|
|
|
|
HotHTML 3.0 Professional
HotHTML 2001 Professional
|
|
|
|
|
|
HotHTML 3.0 Professional
HotHTML 2001 Professional
|
|
|
|
|